
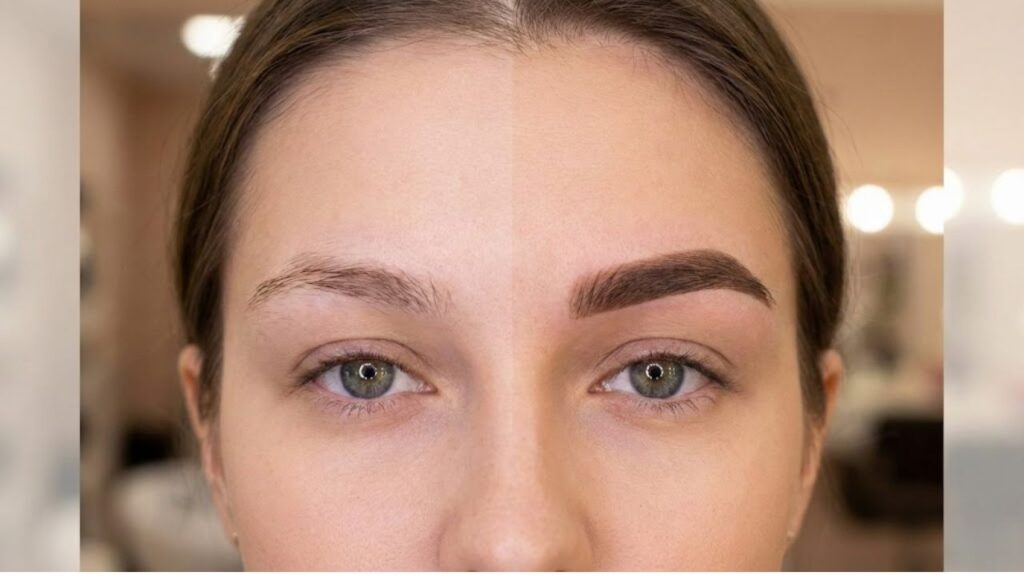
Waking up with full and well-shaped brows without needing a pencil feels like the perfect beauty shortcut. When you tint your eyebrows correctly at home the color can last between 3 & 6 weeks. The important part is being careful & controlled so your brows look natural and enhance your face instead of looking too dark or messy. This guide will show you how to tint your eyebrows safely and neatly at home without making a mess in your bathroom.
Why At-Home Brow Tinting Is Worth Considering
Tinting your brows at home goes beyond convenience or avoiding salon trips. One tint kit typically provides enough product for multiple uses while a professional appointment covers only a single session. When you do it yourself you decide how dark the color should be and how soft the front appears & what the final shape looks like. The color in the hair usually lasts between 3 and 6 weeks and the subtle stain on your skin fades after 5 to 7 days. This creates a gradual fade instead of an abrupt change.

The flexibility is another benefit. You can modify the shade or adjust the timing whenever your hair color changes or your makeup preferences shift with the seasons. Having control over this small detail often makes your entire face appear more refined and put-together even when you skip makeup.

How Long Brow Tint Actually Lasts
The staying power of your brow tint depends on skin type, daily habits, and product use. Hair holds pigment far longer than skin, which is why brows gradually soften instead of vanishing all at once.
| Factor | What You’ll Usually See |
|---|---|
| Dry or normal skin with gentle cleansing | Defined color for 3–6 weeks; skin stain fades in about a week |
| Oily skin, frequent swimming, or strong sun exposure | Noticeable fading after 2–3 weeks |
| Heavy oils, balms, or exfoliants near brows | Color fades faster, especially from the skin |
Treat freshly tinted brows kindly—less heat, less rubbing, and fewer harsh cleansers—and the color will reward you by lasting longer.
What You’ll Need Before You Start
You do not need professional equipment but having the right basics helps you get even color and safer results: Brow-specific tint or gel without ammonia Developer or oxidant that the brand recommends Glass or plastic mixing cup and spatula Angled or precision brow brush Cotton pads & cotton swabs Thick cream or petroleum jelly to protect your skin Gloves & a clean spoolie Micellar water or gentle toner A timer or phone stopwatch Safety is important. Never use regular hair dye on your brows. Some dyes can cause serious eye injuries and ingredients like PPD (p-phenylenediamine) are known to trigger allergic reactions especially on delicate facial skin.
Why Patch Testing Is Non-Negotiable
Before using any tint you should apply a small amount of the mixed product behind your ear or on the inside of your elbow. Leave that area uncovered for 48 to 72 hours. If you notice redness or itching or swelling or blistering then the dye is not safe for you to use. This simple step helps you avoid uncomfortable and visible reactions near your eyes.
Seven Steps to Natural, Salon-Style Brows at Home
Shape Your Brows a Day in Advance
Tweeze the stray hairs that clearly sit above your eyebrows & below them and in the space between both brows. Do not make the main eyebrow shape thinner when you tweeze. Use a pencil to lightly draw the outline of the eyebrow shape you want to achieve. Then clean the entire area using micellar water and carefully wipe away any extra oil from the skin so the tint will go on smoothly & evenly across your brows.
Shield the Surrounding Skin
Apply a thin layer of thick cream or petroleum jelly along the penciled outline you created. Make sure to keep it off the actual brow hairs. This protective barrier stops unwanted staining from occurring and helps you achieve cleaner and sharper edges.

Mix the Tint Smoothly
Mix about 0.5 to 0.75 inch of tint with developer following the instructions on the package. Most products use equal parts of each ingredient. Stir the mixture until it becomes smooth and creamy with no lumps remaining. Pick a color that is one or two shades darker than your natural eyebrow color. Avoid selecting a shade that looks too dark compared to your hair color.
Apply Where Brows Are Fullest
Start at the inside part of your eyebrow closest to your nose. Make small strokes that go in the same direction as your eyebrow hairs grow and make sure each hair is completely covered. Continue moving toward the outer end of your eyebrow but use a little less product as you go. If you have light colored hairs or gray hairs make sure they are completely covered so your eyebrows look even and not patchy.
Process Carefully and Watch the Clock
Set your timer based on what the brand recommends. This is usually somewhere between 7 and 15 minutes. When you reach the 3 to 5 minute point you should take a clean spoolie brush and gently comb through the inner part of your eyebrow. This helps soften the front area and prevents your brows from looking too blocky or harsh.
Remove Gently and Condition
Set your timer according to the brand’s recommended time which typically falls between 7 and 15 minutes. After 3 to 5 minutes have passed you need to take a clean spoolie brush and carefully comb through the inner section of your eyebrow. This step helps create a softer appearance at the front and stops your brows from looking overly blocky or severe.
Check in Natural Light and Begin Aftercare
Let the color set for roughly one hour before you examine the symmetry in natural daylight. Small differences between the two brows are completely normal & you can easily balance them out using makeup. Make sure to keep your brows dry during the first twenty-four hours after the procedure. You should also stay away from any oil-based products & avoid exfoliating the surrounding area for several days following your appointment.
Common Brow Tinting Mistakes to Avoid
Common Tinting Mistakes to Avoid Ignoring the patch test can cause unwanted irritation on your skin. Choosing a shade that is too dark or warm often creates a harsh appearance that looks fake. When removing tint you should use gentle wiping motions because scrubbing causes skin irritation and damages hair follicles. Failing to follow proper aftercare means your tint will fade quickly due to exposure to heat and sunlight or using strong cleansing products.
A Small Change That Makes a Big Difference
A good brow tint makes a real difference in how you look. Your skin appears more refreshed and your eyes become more noticeable. Even when you wear no makeup your face looks put together. When you prepare properly and use safe products and take care of your brows afterward you can tint them at home and enjoy weeks of easy definition. After you discover the right method for your brows you will realize it becomes an essential beauty routine that you cannot imagine living without.