
The first time you put cool aloe gel on a sunburn feels amazing. The heat fades away. Your tight skin relaxes. It feels like your skin can finally breathe again. Now picture this: instead of searching through drugstore shelves for a plastic bottle filled with strange chemicals you simply walk to your windowsill or balcony. You break off a thick green leaf from your own aloe vera plant and squeeze the clear gel right onto your skin. It’s fresh and natural and you grew it yourself.
The Plant That Patiently Awaits Your Sunny Mistakes
Aloe vera is the kind of plant that never holds a grudge. Forget to water it for days—or even weeks—and it stays calm. Move it from one window to another and it doesn’t protest. It simply waits, quietly storing water inside its thick, pointed leaves, ready for the moment you stay too long in the sun, underestimate a midday hike, or irritate your skin without meaning to.

When that moment comes, you’ll be thankful this desert survivor has been sitting in your home all along. Aloe vera may be famous for soothing burns and skin trouble, but as a houseplant it’s refreshingly simple. It doesn’t need special treatment or constant attention—just light, warmth, and time to dry out between waterings. Give it that, and it rewards you with healing gel and a calm, natural presence that makes any room feel grounded.

If you can manage a sunny window and remember not to overwater, aloe vera will do the rest.
Choosing Your First Aloe: Plump Leaves and Healthy Roots
Before aloe can help your skin, you need to choose a strong plant. Not every aloe on a store shelf is in good shape, and starting with a healthy one makes care much easier.
Look for an aloe with upright, firm leaves that feel thick and full. The color may range from soft gray-green to deeper green, sometimes with natural spotting. Avoid plants with mushy areas, yellowing leaves, or a sour smell coming from the soil. Leaves that droop or fold often signal trouble below the surface.
A healthy aloe feels solid, like it’s holding water without being soft. Since this plant evolved in dry climates, anything that looks waterlogged is best left behind.
The Right Pot and Soil for a Desert Plant
Aloe vera needs air around its roots. That means good drainage is non-negotiable. Always choose a pot with drainage holes, and never let the plant sit in standing water.
Use a fast-draining soil mix designed for succulents or cacti. You can also make your own by mixing regular potting soil with coarse sand or perlite. The goal is simple: water should pass through easily, leaving the roots moist but never soaked.
Watering the Aloe Way: Infrequent but Thorough
Most aloe problems come from too much water. It’s easy to feel guilty and water often, but aloe prefers restraint. Constant moisture suffocates its roots and leads to soft, collapsing leaves.
Instead of following a schedule, check the soil. Push your finger a couple of inches down. If there’s any moisture, wait. Only water when the soil is completely dry.
When you do water, soak the soil thoroughly until water drains out the bottom. Then leave it alone. In warm months, this might be every 10–14 days. In winter, once a month is often enough.
Soft, translucent leaves usually mean overwatering. Thin, wrinkled leaves mean the plant is using up its stored water. Aloe thrives when it’s slightly ignored.
| Aloe Care Element | Best Conditions | Warning Signs of Problems |
|---|---|---|
| Sunlight | Plenty of bright light, with mild direct sunlight preferred | Long, weak leaves, faded color, or brown burn marks on tips |
| Watering | Water thoroughly only when the soil is completely dry | Soft or mushy leaves, root decay, or deeply wrinkled foliage |
| Soil Type | Loose, fast-draining cactus or succulent soil mix | Water-logged, dense soil causing poor root health |
| Temperature Range | Warm conditions between 65–85°F (18–29°C) | Cold damage, slowed growth, or leaf injury from frost |
| Fertilizing | Minimal feeding once or twice during spring or summer | Excessively soft growth or white salt buildup on soil surface |
Light and Temperature: Creating a Comfortable Home
Aloe vera loves bright light. A south- or west-facing window works best, where it can enjoy several hours of sun. However, sudden exposure to intense sunlight can scorch the leaves, causing brown or bronze patches.
If your plant has been in low light, introduce stronger sun gradually. Leaves stretching toward the window mean it needs more light. Pale or crispy areas mean it needs protection from harsh rays.

Aloe prefers temperatures between 65–85°F (18–29°C). It tolerates brief cool spells but cannot survive frost. During warm months, aloe can enjoy time outdoors if it’s slowly acclimated and brought inside before cold nights arrive.
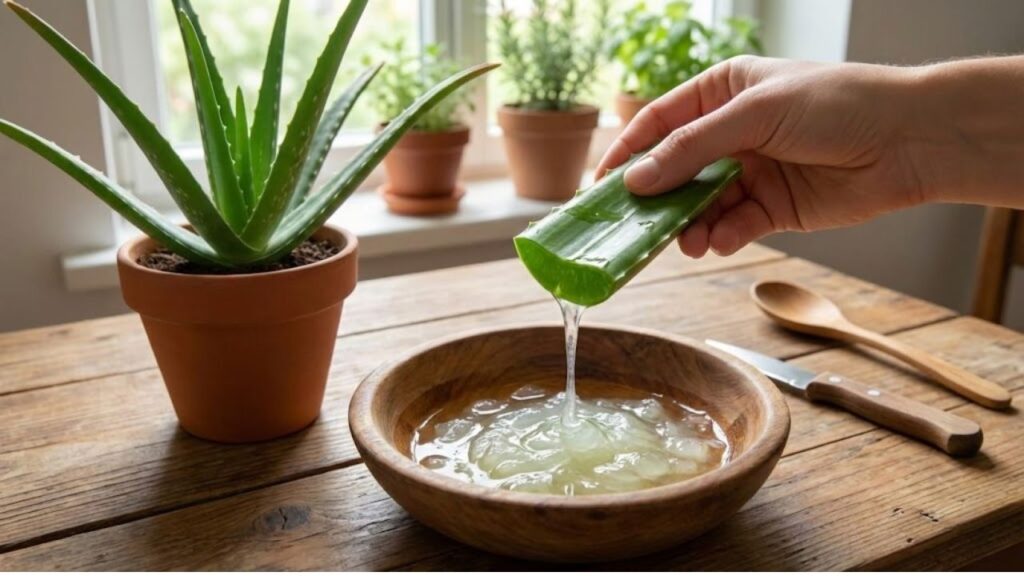
Harvesting Aloe Gel Without Stressing the Plant
Cutting into a mature aloe leaf reveals its clear, cooling gel—nature’s instant relief for mild burns and irritation. Harvesting correctly keeps both you and the plant happy.
Choose large, outer leaves near the base. Cut them cleanly close to the stem, avoiding the central new growth. Let the leaf stand upright for a few minutes so the yellow sap can drain away.
Trim off the spiny edges, peel back the green skin, and use the clear gel inside. Apply it directly to clean skin. The cooling effect is immediate and soothing, helping calm inflammation and restore moisture.
Extra gel can be stored in the refrigerator for a few days, as long as it stays clear and fresh.
Growing More Aloe: From One Plant to Many
With proper care, aloe vera produces small offshoots called pups. These baby plants grow at the base and can be separated to create new aloe plants.
Wait until the pups are a few inches tall. When the soil is dry, gently remove the plant from its pot and separate the pups, making sure each has roots. Plant them in small pots with well-draining soil.
Keep new plants in bright, indirect light for the first week and water lightly. Soon, they’ll establish themselves and grow independently, ready to become gifts or new additions around your home.
Understanding Aloe’s Quiet Signals
Aloe vera communicates through its leaves. Soft, drooping leaves usually mean too much water. Brown, crispy tips can signal too much sun or sudden exposure. Pale, stretched leaves indicate a need for more light.
Occasionally, pests like spider mites or mealybugs may appear. Gently wiping the leaves with a damp cloth and mild soap usually solves the problem.
What makes aloe special is its resilience. Even a neglected plant often recovers once conditions improve. It doesn’t ask for perfection—just attention to its simple needs.
Over time, aloe becomes more than decoration. It’s a quiet reminder that healing doesn’t have to be complicated, and that sometimes the best medicine sits patiently on a sunny windowsill.