
The night I discovered you could sharpen a kitchen knife with a potato peeler happened during a power outage while I was making dinner. The kitchen was silent except for the smell of onions and wet pavement coming through the window. I remember how the knife struggled against a tomato and just crushed it instead of cutting through it cleanly. The blade felt as dull as my mood. Candles were burning on the counter and shadows moved across the walls while I stood there thinking this knife was barely better than a butter knife. That was when my neighbor Leo appeared in the doorway & smiled at me. He told me I could fix the knife in less than a minute using the potato peeler.
The Trick Hiding in Plain Sight
If you cook regularly, you probably have an unspoken bond with your kitchen knives. You know which one glides through onions with minimal tears, which feels balanced when chopping herbs, and which you trust for precise apple slices. You also know the frustration of a dull blade—the crushing of basil instead of clean ribbons, the extra pressure on your wrist, the hesitation before each cut. Many home cooks live with dull knives far longer than they should because sharpening feels complicated and time-consuming. Whetstones, angles, and techniques sound intimidating, so we adapt and push harder. That’s why this potato peeler trick feels almost unfairly simple. It’s quick, practical, and hiding right in your drawer. No special tools, no preparation—just a clever shortcut that brings a tired knife back to life when you need it most.

Why a Potato Peeler Actually Works
At first glance, a potato peeler seems like the last tool you’d associate with sharpening. But look closely at the metal spine behind the peeling blade, especially on sturdy metal peelers. That narrow strip of hardened steel can function as a basic honing surface. Honing doesn’t remove large amounts of metal like sharpening on a stone. Instead, it realigns the microscopic edge that bends over time. Think of it as straightening grass after it’s been pressed down. The potato peeler’s steel ridge gently nudges that edge back into place, restoring smoother cuts and better control. It’s not a permanent fix, but for everyday cooking, it can dramatically improve performance with almost no effort.

Choosing the Right Peeler for the Job
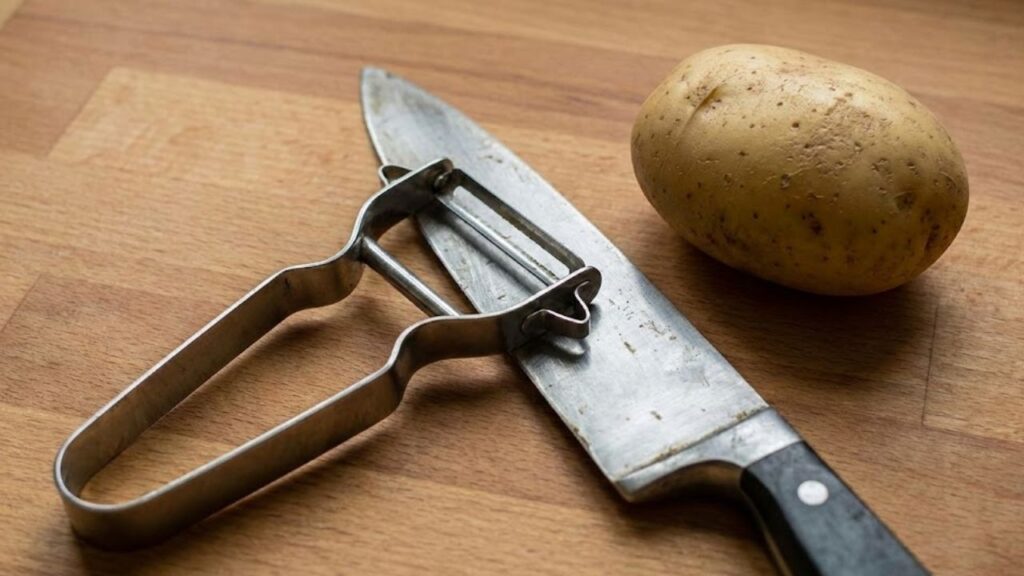
Not every peeler will work well for this trick. You’ll want one with a solid metal body or, at minimum, a firm metal spine behind the blade. Avoid flimsy plastic peelers that flex under pressure. Both straight and Y-shaped peelers can work as long as they have a smooth, stable metal ridge. Before using it, check that the metal is clean and free from rust or deep nicks. A smooth surface ensures consistent contact with your knife and reduces the risk of damaging the blade or slipping during the process.
Safe Grip and Proper Setup
Hold the potato peeler firmly in your non-dominant hand, positioning the metal spine upward and angled slightly away from your body. The peeling blade itself should face outward and remain untouched. In your dominant hand, grip the knife securely with dry hands. A towel nearby can help maintain control. The key here is stability and focus—this isn’t something to rush or do while distracted. Treat it with the same respect you would any knife technique.
Finding the Right Angle
Place the heel of the knife against the peeler’s metal spine at a shallow angle, roughly 15 to 20 degrees. You don’t need to measure it precisely; just avoid laying the blade flat or holding it too upright. A moderate tilt is enough. Consistency matters more than perfection. Maintaining the same angle throughout each pass helps realign the edge evenly along the entire length of the blade.
The Honing Motion Explained
Starting at the heel, draw the knife smoothly along the peeler’s spine toward the tip, moving away from your body. Use light pressure—this is about guidance, not force. Imagine skimming the surface rather than scraping it. Once you reach the tip, lift the blade, reset, and repeat. After one pass, switch sides of the knife and repeat the motion. Alternate sides with each stroke or do a few passes per side. Around six to ten passes on each side is usually sufficient.

Testing the Result
After honing, rinse and dry the knife. Test it gently on a tomato, strawberry, or even a sheet of paper. A revived edge will bite cleanly and glide rather than skid or crush. While it won’t feel like a professionally sharpened blade, the difference should be immediately noticeable. The knife will feel more responsive, requiring less pressure and offering better control.
How This Compares to Traditional Sharpening
This trick isn’t a replacement for proper sharpening with stones or professional services. Think of it as maintenance rather than repair. A whetstone reshapes the edge, while the potato peeler simply realigns it. It’s like inflating bike tires before a ride instead of doing a full mechanical overhaul. For quick, everyday improvements, it’s incredibly effective. For heavily worn or damaged blades, proper sharpening is still essential.
Turning a Quick Hack into a Kitchen Habit
What makes this trick powerful is how easily it fits into daily cooking. Keeping your peeler near your main knife encourages regular use. Pair the habit with another routine, like washing your hands before prep or cleaning the cutting board. Over time, it becomes second nature. This small ritual can make cooking smoother, safer, and more enjoyable. A cooperative knife reduces strain and risk, letting you focus on the rhythm of cooking instead of fighting dull steel.
| Sharpening Method | Approximate Time | Ease of Use | Overall Outcome |
|---|---|---|---|
| Potato Peeler Hack | Less than 60 seconds | Beginner-friendly | Quick edge refresh for daily cooking, short-lasting effect |
| Honing Rod | 1–3 minutes | Basic to moderate | Keeps blade aligned and usable, not true sharpening |
| Whetstone Sharpening | 10–30 minutes | Intermediate to advanced | Professional-level sharpness with edge restoration |
| Electric Knife Sharpener | 2–5 minutes | Very simple | Fast and powerful sharpening, higher metal wear |
Safety Tips and Practical Limits
Always stay focused while honing and never rush. Avoid using this method on delicate, high-end knives unless it’s an emergency. Inspect your peeler before use and stop if the blade still struggles after honing—it may need real sharpening. Used thoughtfully, this trick offers a simple reminder that useful solutions often live right where we least expect them, waiting quietly in the drawer.